Showing posts with label Malaysian cuisine. Show all posts

Sunday, November 15, 2015

Roti Road restaurant review


Malaysian restaurants have been popping up like mushrooms in Melbourne in the recent years. Roti Road which opened last year is one of them. It's my favorite Malaysian restaurant at the moment as they have a wide variety of Malaysian food ranging from hawker dishes, main dishes as well as roti and dim sum. It's fair to say that most of the food I tasted here are pretty good. 

Located on Barkly Street in Footscray, Roti Road is quite a big restaurant. Given the name of the restaurant, I supposed they got to serve good roti? Indeed, there's a roti chef showing off his roti flipping skill at the front window of the kitchen most of the time. 

I've returned to this restaurant multiple times now. However, not all the dishes were captured in photos. The following are the food that I managed to take photos during my visits to Roti Road.

Chicken satay at Roti Road
The chicken satay has topped my list as the best Malaysian satay in Melbourne. The perfectly cooked satay meat was tender and juicy while the peanut sauce was great. 

Roti telur at Roti Road
The Roti Telur which was accompanied by curry, dahl and sambal was good. It's much better than The Mamak's in Melbourne CBD. Somehow, I'm just not a fan of The Mamak's.

Prawn noodles or Har Mee at Roti Road
The prawn noodles or Har Mee was quite authentic. The soup was full of flavour and the portion was enormous. 

Hokkien noodles at Roti Road
The Hokkien noodles was average but decent. It was the thin noodles instead of the usual thick noodles which you can find in KL. Besides that, there weren't pork lard which most people would love to see in Hokkien noodles, except for me. 

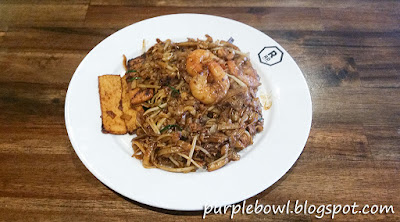
Fried Kuay Teow at Roti Road
Similar to the Hokkien noodles, the fried Kuay Teow was so-so but it wasn't bad. Well, I actually like Paparich QV's fried Kuay Teow the most. 

Chicken curry noodles at Roti Road
The chicken curry noodles was pretty good. The portion was huge and it was loaded with heaps of ingredients such as chicken slices, eggplant, fish cakes and tofu. It's brilliant to use mint leaves as a garnish as it enhanced the flavour of the curry. 

Mixed vegetables with tofu at Roti Road
We had tried some main dishes to go with rice on a few occasions. The mixed vegetables with tofu was not bad. It was tasty. 

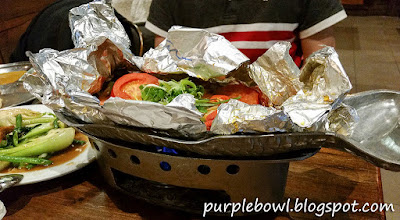
BBQ grilled fish at Roti Road
If you're into spicy fish, you must try the BBQ grilled fish. It was similar to those "Portugese grilled fish" you get from Malaysia. One of the best I would say. 

Overall, Roti Road is one of the best Malaysian restaurants I've found in Melbourne. Since they have a wide selection of food, there'll sure be something that's of your tastebuds. 

Roti Road Menu, Reviews, Photos, Location and Info - Zomato

Thursday, October 8, 2015

Easy homemade kaya recipe

Kaya (coconut jam) toast is a popular food in Malaysia and is available in almost any coffee shop aka kopitiam. Seriously, I can’t recall when the last time I had Kaya toast. Well, kaya toast can be found in some Malaysian restaurants such as PappaRich and Old Town in Melbourne. One can also buy the kaya jars from Asian grocers. However, to me, those kaya aren’t the same as homemade kaya. In my opinion, homemade kaya tends to be richer in flavours, probably because of the quality of the ingredients.

My mum used to make kaya at home when I was young. I remembered it was a tedious process where constantly stirring for hours is inevitable. Hence, it never occurred to me to make my own kaya until I saw this 10-minute kaya recipe from Kitchen Tigress. It’s good to know that there are a few tweaks to shorten the cooking time such as using egg yolks only instead of whole eggs as well as substituting part of the sugar with palm sugar. I added an extra egg yolk and reduced the sugar from the existing recipe. Well, it took me about 20-25 minutes in total from preparation until the kaya is cooked to my preferred texture. 

Easy homemade kaya recipe
Since then, I have ensured that there’s always a jar of homemade kaya available in my fridge! :)

Recipe: 

(to make a bowl, about 170g jar)

5 egg yolks
4 pandan leaves
200ml coconut milk
40g palm sugar
35g castor sugar

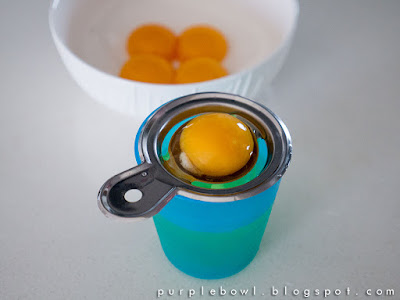
1. Separate the egg yolks from the egg whites. Try to ensure that there isn’t any egg white. Otherwise, the texture of the kaya won’t be as smooth and might be a bit lumpy if it’s cooked over high heat. This is why those recipes with egg whites require cooking over a water bath.

2. Wash the pandan leaves and cut each leaf into 4 parts.

3. Put pandan leaves, coconut milk, palm sugar and castor sugar into a pot. Cook over medium heat until the palm sugar is melted and the mixture starts to simmer. Remove the pot from the heat.

4. Gently mix the egg yolks in a bowl and slowly mix in half of the coconut milk mixture from the pot.

5. Pour the mixture in the bowl back to the pot.

6. Return the pot to the stove. Constantly stirring the mixture over medium heat until it starts to thicken.

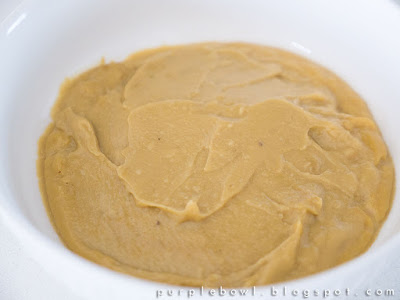
7. Reduce to low heat and keep stirring until the kaya is thickened or to your preferred thickness. I like it slightly thicker and it took me about 15mins to get to my preferred texture.

8. Cool the kaya. Transfer the cooled kaya into a jar and store in the fridge. Used within a week. 

Easy homemade kaya recipe
Homemade kaya recipe
Homemade kaya


Thursday, June 18, 2015

Rice dumpling (Zong zi / Bak zhang) 粽子 recipe

I did it! Haha. Yes, I successfully made rice dumplings or zong zi for the first time. Yay! 

rice dumpling recipe
bak zhang recipe

Well, I really really love eating rice dumplings especially those made by my mum. Whenever I visit Malaysia, my mum would prepare these yummy rice dumplings for me regardless the time of the year. So I eat it for breakfast and tea break everyday until the stock is finished. As the dragon boat festival (that's when Chinese people eat rice dumplings or zong zi) is around the corner, I decided to make my own rice dumplings by following my mum's recipe simply because I can't find any nice rice dumplings around Melbourne! Yup, they actually sell them here (that's how multicultural Melbourne is) around this time but they aren't nice at all. Not to mention, they're expensive considering that there aren't much ingredients in the dumplings sold here!

There's no problem in getting all the ingredients I need to make the rice dumplings in Melbourne. In fact, you can get everything in an Asian grocer like Hometown Asian supermarket. However, the locally made fresh salted egg is really expensive and the quality is not as good as those you get in Malaysia. Somehow, the salted egg yolks from the fresh salted eggs aren't as solid and are a bit runny. Besides that, I'm not into cooked-salted-eggs from China. Luckily, there's this locally made frozen salted egg yolks (yup, egg yolks only. They removed the egg white and packed all the egg yolks in a box) available in the frozen department of Hometown Asian supermarket. It's not cheap (10 frozen egg yolks for AUD15), but at least it guarantees that I get these solid salted egg yolks for making my dumplings. So if you have time, do make your own salted eggs at home!

We're lucky to have fresh chestnut from the local produce. So I used fresh chestnuts instead of dried chestnuts. It's also worthwhile to mention that the bamboo leaves usually come with strings. However, the string snapped every time I tied the dumplings. Thank goodness I've a roll of cooking rope in my pantry for tying the dumplings. Hence, make sure you have some ropes around for backup if you decide to use the bamboo strings. Other than that, I must admit that it's a bit hard to wrap the dumplings at the beginning especially if the dumpling is big. However, after a few wraps, you'll get the hang of it when you gain more confidence. 

Overall, making rice dumplings is very time consuming. From my perspective, the time spent for preparation and wrapping the dumplings isn't too extensive. However, boiling the dumplings on the stove for 2-3 hours is really a long process. I came across some discussions in a forum where people shared their experience in using a pressure cooker for cooking rice dumplings. Apparently, the cooking time was reduced to only 15mins!! Well, I haven't tried that as I don't have a pressure cooker at the moment. I reckon it's worth trying if you have one. 

Rice dumplingrecipe

Recipe: 

(make about 26 rice dumplings)

500g pork belly (without skin)
8 dried mushrooms (I used big dried mushrooms)
1kg glutinous rice
120g dried shrimps 
1 garlic (about 10 cloves)
20 shallots (can be more to give more flavor)
26 chestnuts
13 salted egg yolks 
60 bamboo leaves (2 leaves for each dumpling and extra for backup)
Bamboo strings/cooking rope (enough to tie all the dumplings)
3 tablespoons oil

Seasoning for glutinous rice:
1 tablespoon salt

Marinade for pork belly:
1 teaspoon salt
1 teaspoon white pepper
1 1/2 tablespoons five spice powder
1 tablespoon dark (caramel) soya sauce
3 tablespoons oyster sauce
1 teaspoon Shao xing cooking wine
1 tablespoon light soya sauce
1 teaspoon sesame oil

Preparing the ingredients:


1. Cut pork belly into 2-3cm pieces, marinade and keep it overnight in the fridge. 

2. Soak bamboo leaves and strings in water overnight. Make sure that the water covers all the leaves. Clean each leave on the next day using a clean sponge and water. Drain the water and set the leaves aside. 

3. Soak dried mushrooms overnight and cut into thick slices. 

4. Soak glutinous rice for about 3 hours. Rinse and mix in salt. 

5. Cook fresh chestnuts in boiling water for 8mins and remove the shells. 

6. Soak dried shrimps for 15mins, rinse and pat dry with towel paper. 

7. Chop garlic and shallots. 

8. Cut salted egg yolks into half.

9. Heat oil in a frying pan, fry garlic and shallots until fragrant. 

10. Add in pork belly and the marinade. Briefly stir fry until the pork is half cooked. 

11. Remove the pork from the frying pan. 

12. Pour the remaining stir-fried garlic and shallots as well as the sauce onto the glutinous rice. Mix well. 

13. In the same frying pan, fry the dried shrimps until they're lightly brown and fragrant. Remove from the frying pan and set aside. 

14. Repeat step #13 with the mushrooms. 

Wrapping the rice dumplings: 


1. Stack 2 bamboo leaves with the smooth side facing up and form a cone shape. 

2. Add 1 tablespoon of glutinous rice, followed by 1 piece of pork belly, a slice of mushroom, a chestnut, 1 teaspoon of dried shrimps and 1 halved egg yolk. Cover it with another tablespoon of glutinous rice or more so that the cone is almost filled. 

3. Now, fold down the leaf to cover the brim of the cone and hold it into a triangular shape. You'd need to hold it tight. 

4. Fold the remaining leaves around the pouch by following the triangular shape. 

5. Tie the dumpling tightly with a string. It's important that the dumplings are nicely packed and tied to avoid any leakage when cooking them later.

6. Repeat step #1 to #5 until all the ingredients are used up. 

Cooking the rice dumplings:


1. Fill a large pot with 1/2 - 2/3 of water and add in some salt. Bring the water to boil. 

2. Gently place the rice dumplings into the boiling water. Make sure all the dumplings are submerged in the water. (Use more than a pot or cook the dumplings in batches if your pot is not big enough to cook all the dumplings.)

3. Boil the rice dumplings with the lid covered for about 2-3 hours. As water evaporates while boiling, add some boiling water into the pot whenever the water level goes down.

4. Remove a rice dumpling from the pot after 2.5 hours to check if it's been cooked to the right texture. 

5. Remove all the rice dumplings from the pot once they're cooked and place them in a colander/big strainer if not hanging them somewhere to drain the water. 

6. Serve when it's slightly cooled. I find that rice dumplings taste better after it's cooled. Somehow, it tastes even better on the next day onwards. 

zong zi recipe

Thursday, February 12, 2015

Asian Gourmet Hut restaurant review

Pan mee or mee hoon kueh is my favourite Malaysian food as mentioned in my very first post. So far, the only good pan mee I can find in Melbourne is at Asian Gourmet Hut. I actually discovered this restaurant a few years back when I read the JOM magazine that featured a list of Malaysian restaurants that offered pan mee. After trying each of them, I concluded that Asian Gourmet Hut has the best pan mee of all.

Asian Gourmet Hut is located in Doncaster East which is quite a drive for me from the city. Well, the distance is a small huddle when one is hunting for good food! Since then, we have been visiting this restaurant whenever we feel like having a bowl of pan mee but were lazy to make it at home. If I'm not mistaken, the restaurant only serves pan mee for lunch. The dinner menu consists of the usual chinese dishes. So it's best to call the restaurant to confirm if pan mee is available to avoid disappointment.

pan mee at Asian Gourmet Hut

How did Asian Gourmet Hut's pan mee top the list? Well, it boils down to 2 simple things - the thin pan mee noodles and the soup. Their pan mee noodles are manually torn into thin pieces. Besides that, the pan mee soup has a good balance of flavour. Having said that, I reckon their pan mee is lacking ingredients and I personally prefer more ikan bilis flavour in the soup. 

Other than pan mee, they also serve various double boiled soup and steamed dishes on rice in addition to the usual Malaysian noodles and rice dishes. Unfortunately, I don't have any photos of the double boiled soup and the steamed dishes on rice but I reckon they are quite good and it's something you don't usually get from other Malaysian restaurants in Melbourne. 

wat tan hor at Asian Gourmet Hut

I've tried their wat tan hor too given that I'm a wat tan hor fan. However, I think their wat tan hor is just average and not as good as Laksa King's.

If you're longing for a bowl of pan mee in Melbourne, you must give Asian Gourmet Hut a try! Otherwise, you could always make your own at home by following the pan mee recipe. It's quite easy! :)

Asian Gourmet Hut on Urbanspoon

Wednesday, February 11, 2015

Laksa King restaurant review

There are a number of restaurants that I often visit but I have never blogged about them. For example, Laksa King. So I thought I should give it some attention although I reckon they are already quite popular as there's always a queue on weekends!

Laksa King is a Malaysian restaurant located at Flemington. Although it's quite a big restaurant, it's always packed. Luckily, they are kind enough to set up a proper waiting area with seats for the hungry people. There is a wide selection of food ranging from individual meals such as rice dishes, stir fried noodles, noodles soup, roti and its famous curry laksa to a variety of main dishes. 

Fish fillet noodles and Ipoh fried noodles (aka wat tan hor) are my favourites from Laksa King. Although I'm not so much of a laksa person, I must say that their laksa is pretty good too. 

Fish fillet noodles at Laksa King

The fish fillet noodles at Laksa King is one of the best I've found in Melbourne. The soup is almost perfect and it's always loaded with abundant ingredients as well as fish. There's a fish head version too if you prefer. 

Wat tan hor at Laksa King

Given that I'm a fan of wat tan hor (which is basically fried flat rice noodles with egg gravy), I would order this dish whenever it's offered on the menu. In Laksa King, wat tan hor is named as Ipoh fried noodles on their menu. Again, this dish is packed with generous ingredients such as prawns, squids, pork slices as well as choy sum in the scrumptious egg gravy. To me, it is the best wat tan hor I could get so far as some other Malaysian restaurants tend to have too much burnt taste (wok-hei) for the rice noodles. 

Fish curry laksa at Laksa King

Well, it would be ironic if you didn't try laksa from Laksa King. Similar to the other dishes, it has a generous portion. Interestingly, I love their laksa although I'm not really a fan of laksa. I particularly like the wee-bit of mint leaves garnish on the laksa which actually enhances the flavour quite a bit.

Needless to say, I like Laksa King a lot. It's one of the better Malaysian restaurants close to the city that serves reasonable priced and yummy Malaysian food.

Laksa King on Urbanspoon

Friday, January 9, 2015

Chee cheong fun sweet sauce recipe

Ready made chee cheong fun or rice rolls can easily be found at any Asian supermarkets in Melbourne. It's so convenient that one just need to steam or heat up the rolls before serving. Besides that, most of them are quite good with nice texture and the right thickness. Some of them even come with filling inside the rolls. However, these chee cheong fun don't come with any sauce. Hence, it's up to you to create your own sauce. 

There are various types of chee cheong fun and sauces available in Malaysia. Basically, there are the Hong Kong style light soya sauce chee cheong fun, the Penang style shrimp paste chee cheong fun and the general sweet sauce chee cheong fun that one could find in KL. 

I couldn't get the right sauce for my chee cheong fun until someone kindly shared this lovely sweet sauce recipe on a forum. It tastes just like those in KL! Ever since then, I could always enjoy a perfect plate of sweet sauce chee cheong fun at home. 

Chee cheong fun sweet sauce recipe

By the way, I like to top my chee cheong fun with some yong tau foo (stuffed vegetables/tofu) and various fishballs. Don't be surprised that yong tau foo can be found in Melbourne too. I often get the frozen yong tau foo from Hometown Asian supermarket. Sometimes I think that we're spoilt living in Melbourne as Malaysian food and groceries are easily available. 

Recipe:


3 tablespoons hoisin sauce
2 tablespoons sesame sauce
1 teaspoon thick black caramel sauce
1 teaspoon soya sauce
2/3 tablespoon peanut butter
Sugar - according to your required sweetness
3 tablepoons hot water

1. Mix all the ingredients above in a bowl and stir well.

2. Microwave it for 1.5 minutes. 

3. Remove from the microwave and stir until everything is combined. 

4. Add additional water if needed to your desired thickness.

Chee cheong fun sweet sauce recipe
sweet sauce recipe
Chee cheong fun recipe

Tuesday, December 30, 2014

Creamy butter prawn 奶油虾 recipe

Seafood is becoming a popular choice for a Christmas dish nowadays. It is lighter compared with meat and requires less time to cook. Therefore, Queen Victoria Market is always swamped with people stocking up fresh seafood just before Christmas. I also stocked up some large green banana prawns and fish although I had no idea what I was going to do with them. 

Butter Prawn recipe

In the end, I decided to use half of the prawns for cooking creamy butter prawns. The recipe is very much the same as my creamy butter chicken recipe with a slight modification in preparing the prawns. The result was excellent. The fresh prawn meat worked perfectly with the creamy butter sauce and I like the prawn version more than the chicken version as it is lighter. 

Recipe:

(3-4 servings)

Fried prawns:


16 prawns
A pinch of salt
1 egg
3/4 teaspoon light soya sauce
A few dashes of pepper
Some corn flour (coating for the prawns)
Oil (sufficient to fry the prawns)

1. Clean and butterfly the prawns.

2. Add a pinch of salt to the prawns and mix well.

3. Beat egg in a bowl. Add in light soya sauce and pepper. Mix well. 

4. Heat the oil in a frying pan. Dip each prawn in the egg mixture and coat with corn flour before adding to the frying pan. 

5. Fry the prawns until they're cooked and the coating turn brown. Do not overcook the prawns. Remove them from the heat and leave them aside.


Creamy butter sauce:


6 cloves garlic
1 small piece of ginger
Handful of curry leaves
5 bird eye chillies
50g butter
1 cup* evaporated milk
1/4 cup* water
1 tablespoon oyster sauce
1 1/2 tablespoons shaoxing cooking wine
Salt

* 1 cup = 236ml

1. Mince garlic and ginger. Cut the chillies into slices.

2. Melt the butter in the frying pan or wok. Add the minced garlic and ginger. Stir fry for 30 secs.

3. Add curry leaves, follow by chillies and continue to stir fry until you can smell the aroma of the curry leaves.

4. Stir in evaporated milk and water. Add oyster sauce, shaoxing cooking wine and salt to taste.

5. Cook until the sauce is thicken. Turn off the heat and add in the prawns. Toss the prawns so that each pieces is coated with the sauce.

6. Serve while it's hot.

Butter Prawn recipe
Creamy Butter Prawn recipe

Saturday, September 27, 2014

Braised chicken with egg noodles/wonton noodles recipe

Braised chicken is quite easy to make. It can be served with rice or noodles. I particularly like to use it on egg noodles or wonton noodles. The following recipe is actually from my mum. As usual, when I first received the recipe, it was provided without the proportion of each ingredient. Seems like most seniors would cook by following their instincts and they don't usually measure ;)

Braised chicken with egg noodles/wan tan noodles recipe

Don't worry, I have all the ingredients and their measurements listed based on my taste buds. However, I would suggest altering the portions of the seasoning/marinade based on your liking.

Recipe:

(3-4 servings)

For braised chicken:


6 chicken drumsticks
6 slices ginger
1 chopped onion
2 chopped carrots
4 hard boiled eggs
1 tablespoon corn flour mix well in 2-3 tablespoons of water (reduce the amount of corn flour if you prefer the gravy to be more liquid or vice versa)
2 tablespoons oil
450ml water
Salt

Marinade:

3 tablespoons light soya sauce
2 tablespoons oyster sauce
1 tablespoon dark caramel sauce
1 1/4 teaspoons 5 spice powder
1 teaspoon sugar
A few dashes of pepper

1. Marinate the chicken drumsticks with the marinade and store in the fridge for at least 2 hours.

2. Heat oil in a deep frying pan/wok/pot with a lid for later use. Add in onion and ginger. Stir fry for a while until the onion is soft.

3. Add in chicken together with the marinade. Add in carrots. Continue to stir fry until the skin of the chicken is lightly brown. 

5. Add in water and mix well. Bring it to boil.

6. Add corn flour mix to thicken the sauce.

7. Cover with a lid and simmer for about an hour or until the chicken is tender. Add in the hard boiled eggs 10mins before it's done.

8. Add salt to taste. You can serve the dish with rice or with egg noodles by following the recipe below.


For egg noodles:


4 egg noodles
A bunch of Choy Sum(Asian green veggie) - wash and cut
Fried shallots
Chopped spring onions and corianders
A pot of boiling water with a tablespoon of salt

1. Blanch the Choy Sum in the boiling water. Remove it from the water and leave it aside.

2. Loosen the egg noodles or wonton noodles before adding it into the boiling water for about 30secs. Remove the noodles from the boiling water by using a big strainer and let the noodles run under the cold tap water for a few secs or you could use a big bowl of cold water. After that, place the noodles back to the boiling water for a few secs to warm before transferring the noodles to a plate.

Note: I use to cook each noodles individually or you can cook all at one go if you like.

3. Add some blanched Choy Sum follow by the braised chicken and egg together with its gravy to each plate of noodles.

4. Garnish with fried shallots, chopped spring onions and corianders before serving.

Braised chicken with egg noodles/wan tan noodles recipe

Braised chicken with egg noodles/wan tan noodles recipe - stir fry onions and ginger

Braised chicken with egg noodles/wan tan noodles recipe

Braised chicken with egg noodles/wan tan noodles recipe

Monday, September 22, 2014

Easy homemade chicken satay recipe

Satay is a popular delicacy in South East Asia. In Malaysia, satay stalls can easily be found in many hawker centers, on the street as well as at night markets a.k.a pasar malam in Malay. Satay is a dish where well marinated meat skewers are grilled and served with peanut sauce. It's usually accompanied by diced cucumbers, onions and ketupat (rice cake). In Melbourne, a number of Malaysian restaurants such as Paparich, The Mamak and Little Ipoh offer scrumptious satays in their menu. There's also a famous Indonesian satay restaurant called Kedai Satay in the city and South Yarra.

Easy homemade chicken satay recipe

Making your own satay from scratch require quite substantial effort. The list of spices/ingredients for the marinade and the peanut sauce actually put me off. However, I did come out with homemade chicken satay in the end. And it was easy because I used a ready made satay making kit!

Easy homemade chicken satay recipe - Prima taste ready made satay sauce

Well, I stumbled upon this box of satay kit when I was browsing the Malaysian/Singaporean food aisle at Hometown Asian Supermarket on Elizabeth Street. This ready made satay marinade and peanut sauce are actually from Singapore, produced by Prima Taste. It has no MSG too. Thus, I thought of giving it a try.

Easy homemade chicken satay recipe - ketupat or rice cakes

Since I was going to make satay, I bought a packet of Nona brand ketupat rice too. There are multiple mini rice packets that could be boiled into ketupat (rice cakes).

Easy homemade chicken satay recipe - grilling satay in oven

Making satay suddenly becomes so simple thanks to the ready made marinade and satay sauce. One just need to follow the instructions on the packet. I did add a pinch of salt to the chicken though. Besides that, I used the oven's grill function to grill the satay instead of using an electrical grill or BBQ set as it is easier to clean.

What's the verdict you may ask. It was amazingly good! I reckon the satay made from using Prima Taste's marinade and peanut sauce is comparable to Little Ipoh's. Voila! I could make satays too!

Recipe:
(2 servings)

1 box of Prima Taste satay kit - contains marinade, satay sauce mix and peanut paste.
400g chicken thighs
A pinch of salt
Vegetable oil for brushing the satay
4 Nona mini rice packets
1 cucumber
150ml water for making the sauce as per instruction
Bamboo sticks (the number of sticks required is dependent on how big each satay you make. The box says use 350g of meat for 24 sticks. I only managed to make 10 sticks using 400g of chicken!)

1. Cut chicken into small cubes. Marinate the chicken with the marinade from the box and a pinch of salt. Keep in the fridge overnight.

2. Cook the mini rice packets as per instructions on the packet and cut into cubes. It takes 60-90 mins. So make sure you start this earlier as it needs to be cooled before you could cut them into cubes.

3. Cut cucumber into cubes and keep aside.

4. Thread the chicken meat using the bamboo sticks. Brush oil on each side of the chicken sticks.

5. Grill in pre-heated oven at 220-240c for 5mins. Flip each satay stick and grill for another 3-4 mins at 220-240c. Adjust the temperature from time to time so that the satay is not too burnt.

6. While grilling the satay in the oven, start making the peanut sauce by following the instructions on the box.

7. Serve satay with peanut sauce, ketupat (rice cakes) and cucumbers.

Easy homemade chicken satay recipe - grilling satay in oven

Easy homemade chicken satay recipe - satay and sauce


Saturday, September 13, 2014

Easy oven-steamed emperor herbs chicken recipe

Emperor herbs chicken is a Chinese dish where herbs stuffed and marinated chicken is wrapped by layers of parchment paper and aluminium foil before steaming for hours. This cooking method helps to produce juicy and tender chicken with tasty herbs broth. Apparently, this dish was named after an emperor's favourite dish and thus, emperor herbs chicken. Thankfully we don't need to be an emperor to enjoy this dish today!

Easy oven-steamed emperor herbs chicken recipe

It's not difficult to create this dish from scratch, you just need to gather all the required herbs such as dong quai (chinese angelica), liquorice, codonopsis, ginseng root, red dates and goji berries. However, I chose to use the ready made packet which consists of all the main herbs except red dates and goji berries. The ready made emperor herbs chicken packet usually comes with a packet of herbs/spices as well as a plastic wrap that can be steamed and a sheet of aluminium foil.

Easy oven-steamed emperor herbs chicken recipe  - House of Yi emperor herbs chicken

There are a number of brands producing emperor herbs chicken packets. These packets can be easily found at Asian supermarkets which carry Malaysian or Singapore products such as Hometown Asian Supermarket on Elizabeth Street as well as Laguna at QV. So far, I have tried the A1 brand (from Malaysia) and House of Yi (from Singapore). I prefer the later as House of Yi's herbs are not 100% grounded into powder. You can still see the herbs in small bits. It also has a stronger herbs taste as compared to the A1 brand.

By following the cooking instruction on the packet, the chicken is to be steamed for 2 to 2.5 hours. That's a tad long for me and thus, I decided to cook it using the oven-steam method like how I cooked the oven steamed chicken previously. With oven, the cooking time is significantly reduced to 1.5 hours. It's important to replace the plastic wrap with parchment paper if you're using an oven! Otherwise, the plastic wrap might melt, causing a health hazard.

Recipe:

(4-6 servings)

1 whole chicken
1 emperor herbs chicken packet
A handful of red dates without seeds
A handful of goji berries
1/2 cup of water (if you would like to have more broth)

1. Lay aluminium foil follow by sufficient parchment paper on kitchen top.
Warning: do not use the plastic wrap as supplied if you're using an oven.

2. Wash the chicken and rub the herbs all over the chicken.

3. Wash and rinse red dates and goji berries before stuffing them into the chicken. You could leave a few on the chicken.

4. If you're looking for more broth, pour 1/2 cup water into the stomach of the chicken where the red dates and goji berries are stuffed.

5. Wrap the chicken tightly with parchment paper, follow by aluminium foil.

6. Bake for 1.5 hours at 190c. Rest the chicken in the oven for about 10 mins once it's done.

7. Cut the chicken and serve.

Easy oven-steamed emperor herbs chicken recipe - red dates and goji berries
Easy oven-steamed emperor herbs chicken recipe - stuff chicken with herbs
Easy oven-steamed emperor herbs chicken recipe